
Suppression management is an important task whenever you are targeting a set of audience to receive your emails or sms or push notifications through any channel or any tool. With the latest laws like CAN-SPAM and the fines associated with it it’s of more significance for people who are not meant to to not receive emails than people actually receiving it as the fine associated with former is much more than the revenue generated by the latter. Auto-Suppression is a functionality provided by Salesforce Marketing Cloud where you can prohibit people from receiving emails via automation. Just prepare a list, feed into the system and they would be left out from every email going out of your software.
Some pointers-
- Use an auto-suppression list when you want to assign a suppression list to be used across the entire enterprise or for specific business units for specific send classifications.
- You can assign auto-suppression lists at different levels of your account.
- Suppression lists filter out email addresses and prevent those addresses from receiving your messages.
- Suppression lists serve as a do-not-contact list for your email sends.
- You can assign auto-suppression lists across an entire enterprise or to a specific business unit with a specified send classification
- If you assign an auto-suppression list to the enterprise, email addresses on the auto-suppression list will not receive any messages from any account for the send classification you specify.
Creating a list-
- login into marketing cloud via url – https://mc.s7.exacttarget.com
- go to Email app

- click on Admin in the top menu
- click on Auto-Suppression configuration towards the end of side-menu

- click on create button
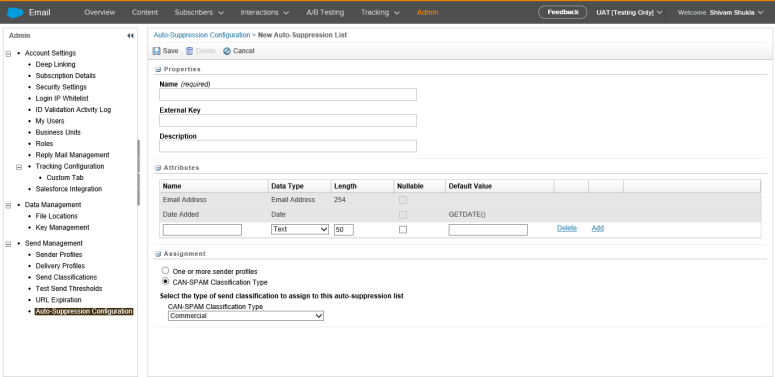
- enter the details as shown in the below demoshot
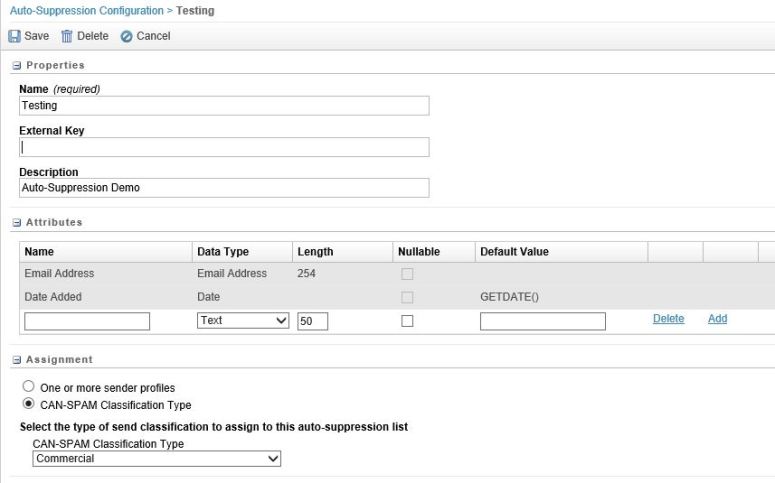
- select the CAN-SPAM classification type- Commercial, transactional or to both

- select the business units you want the suppression to happen
- click on Save

Adding members to list- We cannot import via manual transfer in the auto-suppression list like we do in a data extension. Import can be done only through a import job which will directly insert the records into the list.
- Create a .csv file with 2 colums – ‘Email Address’ and ‘Event Date’. 1st columns is a required field while 2nd is just for record purpose. Put the file on your FTP location
- go to email tab in marketing cloud
- click on Interactions>Import

- Fill in the details
- select the FTP location defined for this file
- select the file-type and provide a filename which matches to the filename on your FTP location
- select Data Extension radio button

- select the auto-suppression configuration option
- select your list you just created
- select the import type as add and update or overwrite as per business requirement
- enter a notification email address to receive success or error logs on imports done

- click Save
Resources-
- https://help.marketingcloud.com/en/documentation/
- https://help.marketingcloud.com/en/documentation/exacttarget/admin/auto_suppression_lists/
![]()

Nice article Shiva thanks for sharing helps marketing cloud users lot
LikeLiked by 1 person
Thanks for suggesting for the same
LikeLike
Hello,
Thank you for this article.
Do you know if this feature is available in Mobile Studio ?
Thank you,
Zak
LikeLike
sorry for the delayed response but as per my knowledge this feature is available only for Email Studio. please correct me if i am wrong
LikeLike
Hi,
On 2nd thought, can’t you use the Automatic Opt-outs feature where you you can stop a list of people to receive any communication based on the deactivation file in mobile connect.
LikeLike
Thank you for taking the time to write this out to help the community. Are you limited to emailaddress being the point of data to determine which records need to be suppressed? Other data fields?
LikeLike
Hello, sorry for a really late reply but right now auto suppression works on email fields only as that is the subscriber key mostly used. we can have other fields too but they are not so much out of the box.
LikeLike